So You Want to Get Your Work Printed
This a relatively easy task to achieve, when you think about it. However, there are many different factors and variables that need to be thought about before printing. One of the most important, and perhaps the most forgotten about, is something called "bleed".
Whether your print ready document has bleed or no bleed largely determines the outcome of the final product.
Printing With A Bleed
"Bleed" is a printing term used to indicate the area that will be trimmed off after the file is printed and cut down the the finished size. Anything that touches the edge of your paper requires a bleed. The bleed area allows for slight movement of the paper during the trimming process. Here at AlphaGraphics, we require a 1/8 inch bleed.

Safe Zones
It is also recommended that all other text and important information stay inside a "Safe Zone". All important information in the safe zone should be no closer to than 1/8" to the final trimmed edge. This insures a professional appearance and eliminates any risk of type or images being lost during trimming.
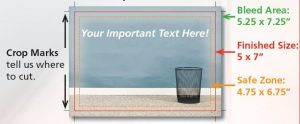
Crop Marks
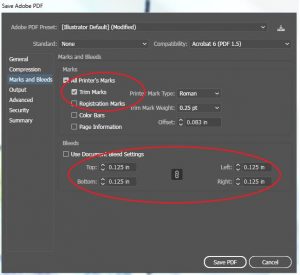
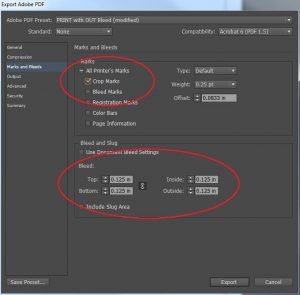
Crop marks (Trim Marks) are used to indicate the finished size of the paper. The crop marks are added when you save your document. Below are the proper settings to save your document with bleed and crop marks.
Illustrator
InDesign
Your File is Ready to Send
Once you add the bleed and crop marks your file should be ready to send and print! AlphaGraphics locations print from PDF files.
Most design software will allow you to save your document as a PDF by clicking "File" and then "Save As" and changing the file type to PDF before saving the document.
Questions?
Feel free to ask us anything in the comment section or contact us here at AlphaGraphics Knoxville!